Getting started with Azure Container Apps
- Print
- DarkLight
- Download PDF
Getting started with Azure Container Apps
- Print
- DarkLight
- Download PDF
Article summary
Did you find this summary helpful?
Thank you for your feedback!
#ServerlessTips - Azure Container Apps
Author: Stephane Eyskens Azure MVP
Container Apps, the last-born container service in Azure, aims to make your life easy. To get started, you need one Container App Environment and one Container App. If you explore the service, you can use the Azure Portal to provide both the environment and the app. Microsoft makes available a quick start image.
To provision resources, using a declarative approach (Infrastructure as Code), you can use ARM templates, BICEP, and Terraform. You can have a look at the following online documentation https://learn.microsoft.com/en-us/azure/templates/microsoft.web/containerapps?pivots=deployment-language-bicep
At this stage, Container Apps is not yet part of the AzureRM provider, but you can (like any other resource) use the AzAPI provider.
If you prefer an imperative approach, you can use the Azure CLI and its az containerapp command. A few commands are enough to provide a container app.
az containerapp env create -n < environment name > -g < resource group >
The above command will automatically create a Log Analytics workspace. Alternatively, you can provide your workspace with the –logs-workspace-id and –logs-workspace-key arguments. Similarly, you can provide your VNET through the –infrastructure-subnet-resource-id argument. Mind that the minimal subnet size must be a /23.
Once your environment is created, you can provision an app into it:
az containerapp create -n <app name> -g <resource group> --image <image> --environment <environment name> --min-replicas 1
You can optionally enable ingress if your container is a web app and you want to browse it. Of course, what makes Container Apps different from other container services, is the fact that they embed both Dapr and KEDA. So, you can't tell you have tested the service without testing at least one of them. It turns out that you can quickly test Dapr with ACA, thanks to one of the samples provided by Dapr itself on their GitHub https://github.com/dapr/samples/tree/master/knative-distributed-calculator/deploy. It is a multilingual calculator with each operation (add, multiply, divide, subtract) written in a different language. They are consumed by a front-end app yet written in another language. It is initially intended to be used within K8s, but it works fine in ACA. By reverse-engineering the provided YAML files a little bit, you can easily deduct the expected Dapr Application ID and port used by these apps. Therefore, run the following commands:
az containerapp create -n addapp -g <group> --environment <env> --cpu 1 --memory 2 --enable-dapr --dapr-app-id addapp --dapr-app-port 6000 --dapr-app-protocol http --min-replicas 1 --image dapriosamples/distributed-calculator-go:latest

az containerapp create -n divideapp -g <group> --environment <env> --cpu 1 --memory 2 --enable-dapr --dapr-app-id divideapp --dapr-app-port 4000 --dapr-app-protocol http --min-replicas 1 --image dapriosamples/distributed-calculator-node:latest

az containerapp create -n multiplyapp -g <group> --environment <env> --cpu 1 --memory 2 --enable-dapr --dapr-app-id multiplyapp --dapr-app-port 5000 --dapr-app-protocol http --min-replicas 1 --image dapriosamples/distributed-calculator-python:latest

az containerapp create -n substractapp -g <group> --environment <env> --cpu 1 --memory 2 --enable-dapr --dapr-app-id subtractapp --dapr-app-port 80 --dapr-app-protocol http --min-replicas 1 --image dapriosamples/distributed-calculator-csharp:latest
will deploy the operations just fine. The last command is required to deploy the front end:
az containerapp create -n calculator-front-end -g < group > --environment < env > --cpu 1 --memory 2 --enable-dapr --dapr-app-id calculator-front-end --dapr-app-port 8080 --dapr-app-protocol http --min-replicas 1 --image dapriosamples/distributed-calculator-react-calculator:latest --ingress external --target-port 8080
For the last app, I have enabled the ingress because I want to be able to test the calculator. Once everything is deployed, you should be able to browse the front end (you can copy the URL from the overview blade):
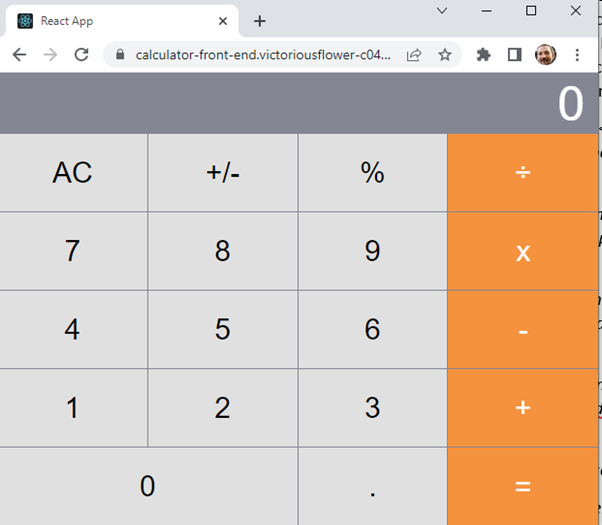
And play with the calculator. Optionally, suppose you want to push your first experience further. In that case, you can add an identity provider for the front-end calculator to offload the authentication and authorization bits to the ACA service. You will end up with something like this next time you visit the front end:
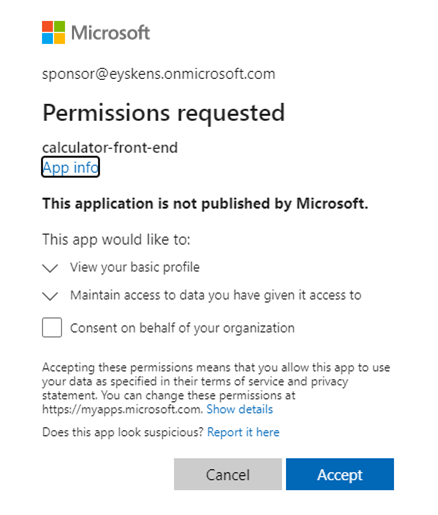
You can prevent the consent prompt (for other users) by requesting an admin to consent on behalf of your organization.
You will notice that the multiply operation does not work. I invite you to read the quick tip on Troubleshooting an Azure Container App to understand why.
That's all it takes to get started with Container Apps.
Was this article helpful?